Monday, October 29, 2007

I ain't lion

Over the past couple of years, lions have become a popular costume in our house.

This is C in 2003, when he was 2. I don't even remember where I got this costume but it was just fuzzy sack with a hood. We put on yellow sweats (you can't imagine how hard toddler sweats in yellow are to come by) under it because it had no arms or legs.

Photo Sharing and Video Hosting at Photobucket


This picture is the same halloween, I just show it because of the funny back story. Dh worked nights at Kinko's at the time. We took C trick or treating and then stopped by to show daddy his costume. While we were there, he was running around behind the counter like he always did. As we headed out to leave, the cops pull up, guns drawn, yelling at us to get out of the way. While I was taking this picture, C was pushing the button for the silent alarm and calling the cops!! Never would have guessed I would get a picture of my kid doing that :)
Photo Sharing and Video Hosting at Photobucket

This picture is Lizzie in the lion sack last year. This was taken at school. she was tired and stressed (too many people she didn't know) and mad that she couldn't stay in my room.

Photo Sharing and Video Hosting at Photobucket

Finally, this is us this year. I am the lion in my brown sweats and silly mask. I wish they made lion sacks to fit mommies :)

Photo Sharing and Video Hosting at Photobucket

Devils are a recurring theme in our family as well. My aunt sewed me a devil costume for my first halloween and both kids have worn it. C for his second halloween because he was only 12 days old for his first halloween. Lizzie worn it on her first as well. I don't have pictures of because her's were lost when the drive died. I've also dressed a devil for various halloweens throughout the years. It and army man were my 2 fall back costumes. If I lamed out and didn't come up with anything, I would toss on camo pants and khaki green t-shirt and call it army or a short red dress and high heels with a horn headband and call it devil. I still have all the parts of both costumes but I like the ones I've come up with recently more :)

Our fun weekend

We had a fun and busy weekend. Friday night, C's school had a retro dance. Originally, I was going to dress him from the 50s and Liz from the 80s because both are easy and cheap to do. Then C decided that he wanted to dress "fancy" which meant dress pants, a button up shirt and his tie. He is so funny. Anytime we are going to a party, he always to dress "fancy" I agreed that was fine and he could dress fancy. I dressed from the 90s (C said 1996 was retro and that I would ok LOL) because I still have those clothes. Next year, I think I will either not dress up or I'll try for the 80s or 70s. As we got dressed, we found out that C's fancy clothes don't fit him well anymore. We couldn't get the neck buttoned and the sleeves were too short. We ended up letting him wear it with jeans and tennis shoes, unbuttoned collar and rolled up sleeves. He looked stylish, although not from a certain decade.

Photo Sharing and Video Hosting at Photobucket

We dressed Lizzie in an over sized t-shirt and ripped tights. Then we put a belt (actually one of my full circle head bands with an elastic piece because apparently her waist is the same size as my head :) )on her and pulled the shirt up so it created a blousy effect and skirt. Then we spiked her hair (we got some major gel to do the job) and put blue eye shadow on her. She was a punk rock super star

Photo Sharing and Video Hosting at Photobucket

The dance was fun. The major issues was the "DJs" were high school girls who had no idea about retro music. They ended up playing the same several songs repeatedly because they didn't know what else to play. Several other K students showed up so C had plenty of people to hang with. Both kids danced their pants off for the whole 2 hours.


Liz was very tired by the end of the dance. Photo Sharing and Video Hosting at Photobucket
We came home and they CRASHED big time.

Saturday night, we went pumpkin chucking. A friend of FIL's works for the ACoE and a few years ago, they had a pumpkin chucking contest. He and his students made this massive pumpkin catapault and when the contest was over they didn't want to get rid of it. So every year we have a party at his farm and roast hot dogs and do a hayrack ride and chuck pumpkins into the field.

Photo Sharing and Video Hosting at Photobucket

We invited J and his family and the kids all had a really great time. At first, it wasn't terribly exciting because the field was unmowed and you couldn't see the pumpkins splatter. We chucked a few pumpkins and then FIL got the mower and mowed a couple of passes where the pumpkins were landing. Then it got better. The boys and Liz got to help load the basket and tell them when to throw the pumpkins.


We chucked for awhile then little J decided he was hungry and I agreed I was as well so we started roasting the hot dogs. The boys ran and played in the dark for a while, then we did the hay rack ride. MIL and her sister decided to dress up and scare the kids. She went way over the top and little J and Liz were both crying by the time my mom finally told them to cut it out and leave them alone. After the hayrack ride, everyone was tired so we headed home and to bed :)

Sunday we went to the free movie (surf's up) and then home to take a nap and finish carving all the pumpkins that have been collected this fall :)

Today Dave and C went bowling and Liz and I joined them for pizza. Now she is napping and he is playing a video game. In a couple of hours, we are going to go trick or treating at the mall, which will be crazy and insane and miserably hot. However, the kids enjoy it and it is a nice way to trick or treat, in case the weather turns dicey on Weds.

Thursday, October 25, 2007

Dia de los Muertos

Day of the Dead> is a Mexican/Spanish holiday honoring the lives of the deceased. The first I ever heard of this holiday was my freshman year in high school in Spanish 1. A bit of background on this. My Spanish teacher was HORRIBLE. She rarely had control of the classroom, she cried probably once a week in class because the students wouldn't listen to her. She would take weeks (and sometimes months) to grade and return assignments. We did a food unit and she left the leche (milk) setting on the table for 4 days before a student finally took it and threw it away. During the same unit, a student in the class threw one of the fruits at her. She spins around from the board and demands "who threw that?" The person that threw it had picked up the other piece of fruit to lauch it as well and simply sat there with his hand in the air, holding the apple and just didn't move. Apparently she didn't notice because she demands again "if someone doesn't step forward, I'll have to punish everyone" Then she turned back to the board and continued writing. The student proceeded to throw the apple at her again. Students would show up until after she took attendence and then leave the room while she wasn't looking to go to lunch early. She never figured out what was happening. Her comment always was "hm, I thought they were here, I must have done attendence wrong but it is too late now" She had "Pesatas" that she gave out for participation in class. Her student assistant took her master and made tons of copies of it and passed them out to everyone. Then, instead of participating, all we had to do was cut out 5 (you only needed one a day) and hand them in at the end of the week and we would get an A for participation. It took a few months, but eventually she figured out that no one was participating, yet we were all handing in enough pesatas. She bought a cutsie little stamp (I want to say Cabbage Patch Kids, but I can't remember for sure)and stamped the backs of all the pesatas she handed out. To combat this, her assistant took her stamp, brought it to lunch and stamped all the copies he had made. She never did figure out what was happening. There were 2 Spanish 1 classes and at one point in the year, we took a test. Spanish 1 5th hour did much better on the test than Spanish 1 4th hour. She decided to add a curve to the grades but curves the classes seperately. This caused the people in 5th hour to have a general cow because they were all very competative about GPA, even during freshman year. We argued with her, explaining that class rank wasn't broken up 4th hour and 5th hour and the freshman class was the freshman class, that curving the grades seperately caused some people to lose their spot in the class rankings and that wasn't fair. She was having none of it so one of the girls in the class announced that she wouldn't participate again until the grades were curved together. Several of her friends were in the class and backed her and the idea spread to the rest of the class. We all sat silently and refused to participate for nearly 10 minutes. At that point, she had asked several questions and had gotten nothing back except silent stares. That was all she could take and she broke down bawling and promised to fix the grades and BEGGED us to "please, please please just start answering questions again. It isn't fair for you all to sit there and not say anything" She did fix the grades and it caused several people to score over 100 on the test, but there wasn't a lot she could do, aside from just teaching and hoping we retained something without participating. 6 weeks before the end of the year, she was moved out of the classroom, into a large closet in the home-ec, where she did lesson planning. She was replaced in the classroom with a sub whose only Spanish background was the fact that she taught in Texas for a few months. We learned little or nothing that year and from that point forward, all the Spanish classes were remedial, trying to catch us up to were we should be.

Anyway, all of that is because somebody mention day of the dead and it reminded me of her trying to celebrate it with us. She made Pan de Muerto, which is "bread of the dead" and brought it in. We had only been in school a few months but we already knew she was totally insane. The bread is supposed to have licorice in it but she went totally overboard. The whole room reeked of it for 2 days. I wouldn't touch it and neither would most of my classmates. Afterward, we termed it "Death Bread" because it probably would have killed us if we tried to eat it!

Torn paper tutorial

Creating torn paper

This is an action you can download from Atomic Cupcake. Although there are plenty of reasons to pay the fee and get the actions from them, this is not one of them.

1. Create a new document
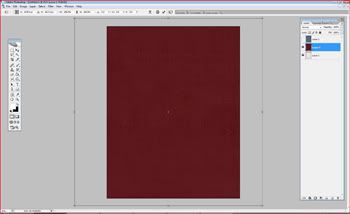
2. Create a background or place paper on the document. Then you will need to select another paper or background to place in a second layer over the first. For my example, I have chosen the red and blue papers from Hummie’s patriotic kit.
3. Resize your papers to fit your document size. I scrap 8.5x11 and most papers are 12x12 (or 8x8 occasionally) so I have to resize nearly everything.

Photo Sharing and Video Hosting at Photobucket

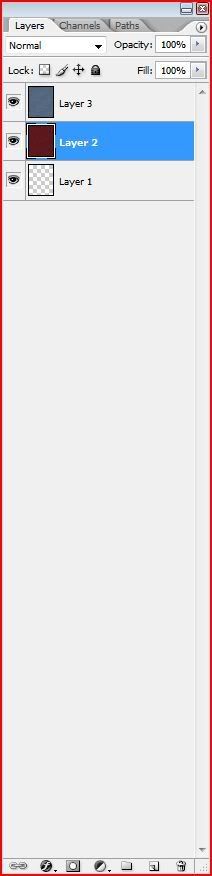
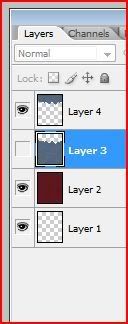
4. Once your papers are resized, determine which paper you want to tear. Move this layer to the top of your layers palette. In my example, I’m tearing the blue paper so I have made it the uppermost layer.

Photo Sharing and Video Hosting at Photobucket

5. Select the free hand lasso tool in the tool box.

Photo Sharing and Video Hosting at Photobucket

6. Decide how big you want your torn piece to be. I prefer bigger over smaller so I am selecting a large area.
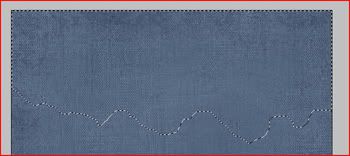
7. Make sure the layer you want to tear is selected, then click the left hand corner of the document and drag your mouse across the page. There is no need to worry about keeping a straight line since you want it to be jagged. Once you reach the right side of the document, drag the pointer up, over and back down to the starting point. It is ok to go outside the edges of your document for this to ensure that you get all of the paper you want to tear.

Photo Sharing and Video Hosting at Photobucket

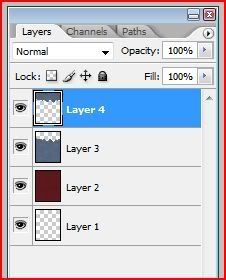
8. Once you have a shape selected (indicated by the marching ants line), click Layer>New>layer via cut or type shift+control+j. This places your selection on a new layer.

Photo Sharing and Video Hosting at Photobucket

9. Now you need to do something with the rest of the background layer. You can either hide it by clicking the eye icon next to it or you can delete it by right clicking and selecting delete layer. I chose to hide mine for this example.
Photo Sharing and Video Hosting at Photobucket

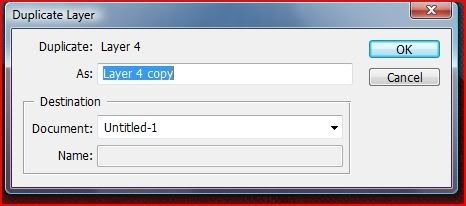
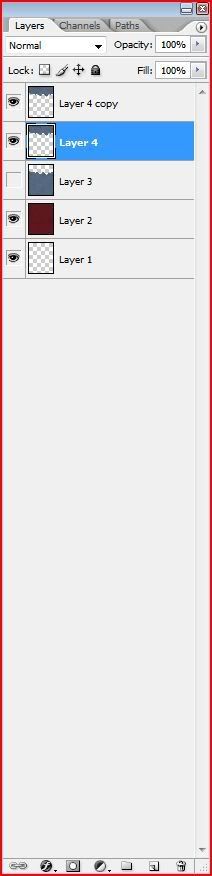
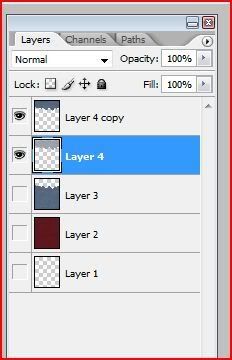
10. Click on your torn layer to highlight it. Then right click and select duplicate layer.

Photo Sharing and Video Hosting at Photobucket

11. Click your bottom torn layer to make it active. Select your move tool or type V

Photo Sharing and Video Hosting at Photobucket

Photo Sharing and Video Hosting at Photobucket

12. Use the arrows on the keyboard to nudge the layer down a little bit. Try 5 or 6 pixels to start.
13. With the bottom torn layer still active, select Image>Adjustments>Hue/saturation or type ctrl+u and increase the lightness by 50.

Photo Sharing and Video Hosting at Photobucket

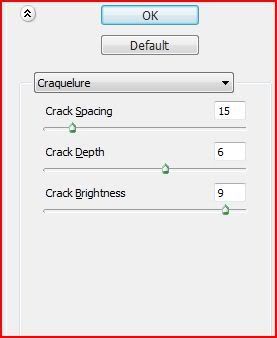
14. Next select Filter>Texture>Craquelure. Play with the setting until you get the right amount of texture.

Photo Sharing and Video Hosting at Photobucket

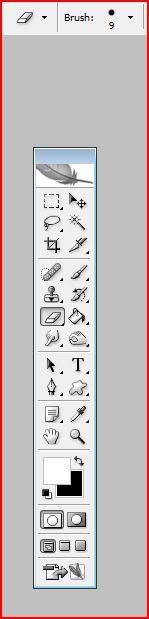
15. Select your eraser tool. At this point I like to zoom in to about 50% so I can actually see what I’m doing.

Photo Sharing and Video Hosting at Photobucket

Photo Sharing and Video Hosting at Photobucket

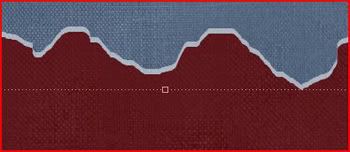
16. Drag the eraser along the bottom of the lighten layer to make the cut more irregular.

Photo Sharing and Video Hosting at Photobucket

17. Hide all layers except your two torn layers then select Layer>Merge Visible or type Shift+Ctrl+E. This will merge the two torn layers so that they can be moved together.

Photo Sharing and Video Hosting at Photobucket

18. Don’t forget to add a drop shadow and you are done.

Photo Sharing and Video Hosting at Photobucket

Wednesday, October 24, 2007

Kudos and other things

So I posted a tutorial that I wrote last night. Typically, I couldn't care less what people think but in this case, someone I really respect commented that she thought I did a good job on it and I'm am outrageously pleased by it. I know I link and I link to her, but seriously go visit Hummie Her site is like the scrapping holy grail. Anything you want, you can find either at her site or from her site.

And there are a million other things I should be doing right now, but instead of vacumming, I'm sitting on my backside, blogging. Sad.

Tuesday, October 23, 2007

Folded corner tutorial

Thanks to Claudette for providing the original tut that I followed to figure out how to do this. Thanks also to Hummie for the eyelet I used in the final corner. It is from her patriotic kit.

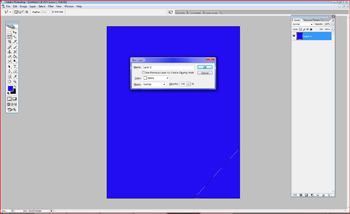
In your document, either drag your paper in or fill with color.

Photo Sharing and Video Hosting at Photobucket

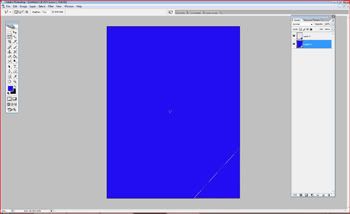
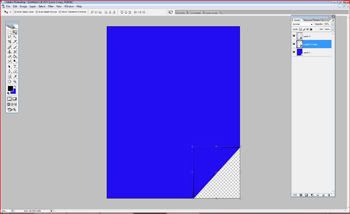
Select the Polygonal Lasso tool. With this tool, draw a triangle shape in the corner of your choice. I have chosen the lower right hand corner.

Once you have drawn the triangle, use ctrl+alt+j to create a new layer with the triangle selection on it.

Photo Sharing and Video Hosting at Photobucket

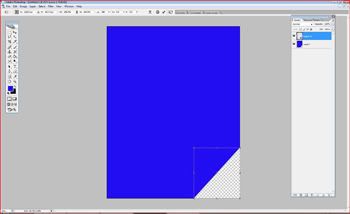
Click on the background layer to highlight it. Then ctrl + click on the triangle layer to select it on the background layer. Then hit delete to delete the shape from the background layer.

Once you have deleted the triangle shape from the background layer, click on layer 2 to highlight it. Then select the movement tool (or type v). Click the bounding box and type 180 in the degrees turn box. Confirm this rotation by pressing enter or clicking the hand tool.

Photo Sharing and Video Hosting at Photobucket

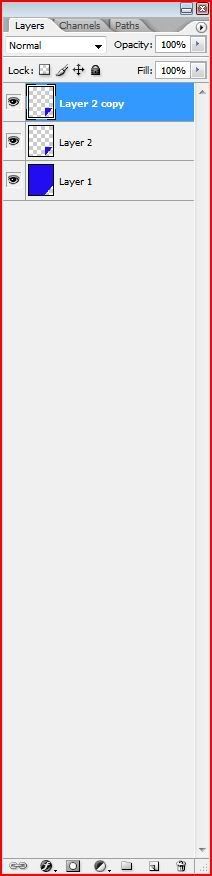
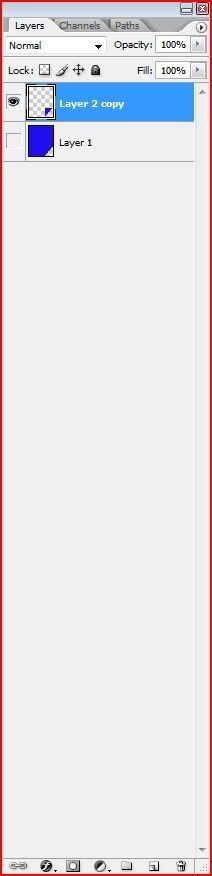
Duplicate the triangle layer. Drag the copy under the original triangle layer.

Photo Sharing and Video Hosting at Photobucket

Switch the foreground color to black. Click the gradient/fill tool (or press G) and fill the triangle shape on layer 2 copy with black.

Photo Sharing and Video Hosting at Photobucket

Photo Sharing and Video Hosting at Photobucket

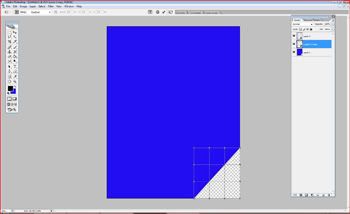
Click the move tool (or press V) then click on the bounding box edge. At the top of the window, 3 icons will appear. Click the bend tool.

Photo Sharing and Video Hosting at Photobucket

This will cause a grid of points to appear on the black triangle layer.

Click the points at the edge of the triangle and pull them slightly outward. This will cause the black triangle to peek out from under the blue triangle. The black (aka the shadow) will show were the corner is folded because the corner will be further away from the background.

Click the check mark by the bend tool to confirm this change.

In the layers palette, select the shadow layer then the opacity slider. Make the opacity around 50% You can play until it looks realistic.

Photo Sharing and Video Hosting at Photobucket

Set the mode to multiply.

Photo Sharing and Video Hosting at Photobucket

Click the eye icon on the background layer to hide it. Then highlight layer 2. Next select Layer>merge visible.

Photo Sharing and Video Hosting at Photobucket

Unhide the background layer by clicking the box where the eye icon was previously.

You can now use the dodge tool to highlight the top corner of the folded corner, making it appear that the paper is catching some glare. Alternately, you can place a brad, eyelet or other fastner to “hold” the corner down.

Photo Sharing and Video Hosting at Photobucket

Monday, October 22, 2007

Essential oils

Anyone know anything about essential oils? Can they go bad? I went to the HFS to get some stuff for the humidifier today and the testers were horrible. I actually gagged when I smelled the tea tree oil. Which, then of course I had to proclaim, "Evan, this is horrible. Smell this" LOL The bottle I bought smelled fine, but the tester was bad bad bad!

I'm also very hungry. This is nothing new but I sat here for several minutes trying to figure out why I was hungry. Then it occurred to me that I hadn't actually eaten dinner since I had a super late lunch. So no wonder, seven hours after my last meal, I'm hungry :)